Print to PDF Without Getting Prompted for a Filename
Since writing this article, I have found there is a much easier way to accomplish this – to use PDFCreator, which is free and has an autosave capability (which includes the date in the filename). With PDFCreator, there is no need for cygwin, Perl and Redmon. I am keeping this article posted however in case this other method is useful to anyone.
My 5 year old likes to hit the “print” button a little too much on her games, and 90% of the time she doesn’t go downstairs (network print) to the printer to see what she did. I ended up wasting too much paper.
To solve this issue, I created a default printer that would silently print to a pdf file with a file name containing the date and time (YYMMDD_HHMMSS.pdf) to a directory of my choosing (instead of sending it to a physical printer). This way anything that she prints will not waste paper, and if she really wants what she printed, we can print the pdf file. It has the added benefit of saving anything she wanted to print in case she ever wants to print it again.
Using this page as a guide (but doing something different), I setup a postscript printer that prints to a redirected port. Printing to a redirected port allows to send the postscript data to the STDIN of a program of my choosing. The program that I chose was a perl script (created by me) that would create the desired filename (with the date and time) and then send the postscript to a pdf converter.
I had tried to accomplish this using the Acrobat Distiller (and telling it to not prompt for a filename), but I couldn’t get this to work to print out files with different names, so I settled on the solution documented here.
This guide copies some of its steps from this page.
Here is how I did this:
- If you don’t have it already, you need to have cygwin installed. You will need the Perl and Ghostscript packages.
- Download redmon17.zip, and install it.
- Create the Virtual Postscript Printer and associate it to a newly created RPT1: port.
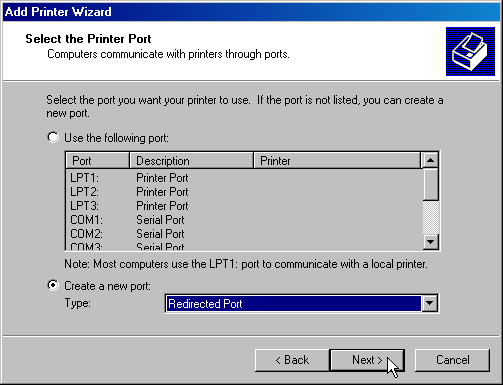
- Using the Add a printer Wizard we add our virtual Postscript printer.
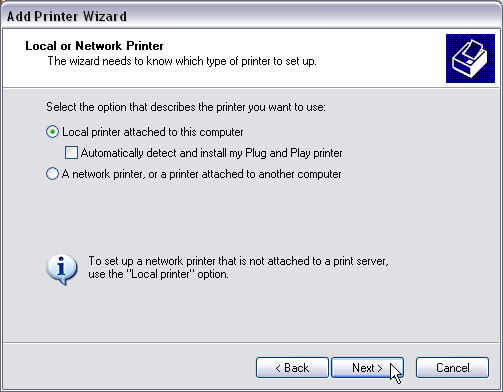
Select a Local printer attached to this computer option (the virtual printer will act like a local printer)

Select Create a new port and choose Redirected Port as the Type of Port.
- Do not choose the FILE: or any other port here!
- If you are using Windows XP/2000 and you do not have a Redirected Port as an option then the installation of RedMon (above) failed. You cannot continue until RedMon is properly installed.
- Windows 98 will not list a redirected port here. For Windows 98 first select the printer (HP Color LaserJet PS) and then select FILE: as the port. After creating the printer, add the RPT1: printer port under the Details tab of the printer properties. The process is similar to these steps, but make sure to configure the printer and the port as described below.
- The Windows 2000 screen looks significantly different then the XP screen shown above. The functionality remains the same.
Click on Next and

accept the default Port Name of RPT1: (or RPT2:, etc.) by clicking OK. Now select the default printer to associate with this port.

Select the HP printer HP Color Laserjet 4550 PS. This is the virtual printer we are creating so even if you do not own this printer select this choice. Certain other (but not all) printer selection will work here. Important is that printer be a color Postscript printer. Some printers seem to give better font quality output then others. I have had good success with this one. Under Windows 2000 select the HP C LaserJet 4500-PS printer. Click on Next until you must name your printer:
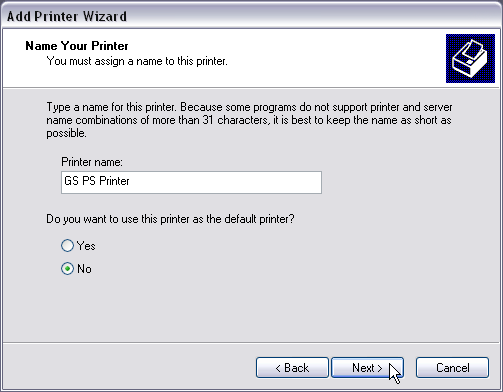
Name the printer GS PS Printer (or anything else that suits your fancy) and you probably may or may not want it to be your default printer. Click on Next and Next again on the Printer Sharing page until you reach the Print Test Page dialog box:
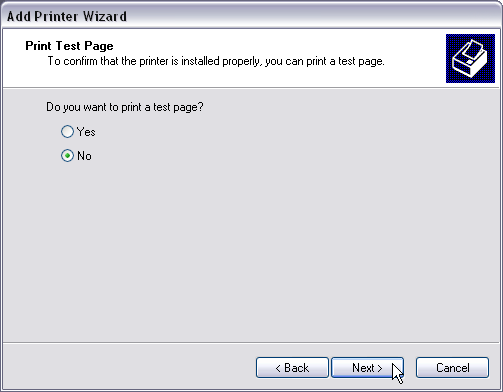
Make sure you do not print a test page. Click on Next and then Finish to actually install the printer.
This printer will become our virtual Postscript printer. We can share it and print to it from other systems including a Windows 98 virtual machine (where most of my 5 year old’s games run) and Linux and Macintosh. The Windows 98 printer type should be set to “HP Color LaserJet PS” (as HP Color Laserjet 4550 PS is not available). The Linux system can be configured to print to a HP LaserJet 4050 Postscript printer or simply a Raw Print Queue.
- Using the Add a printer Wizard we add our virtual Postscript printer.
- Download the Perl Script, download printpdf.pltxt to c:\cygwin\bin (and rename it to printpdf.pl)
- Modify the Perl script on line 6 ($outpath=…) in order to point to the directory where you would like to store the .pdf files.
- Configure the RPT1: port:
- Select Properties of the newly created GS PS Printer
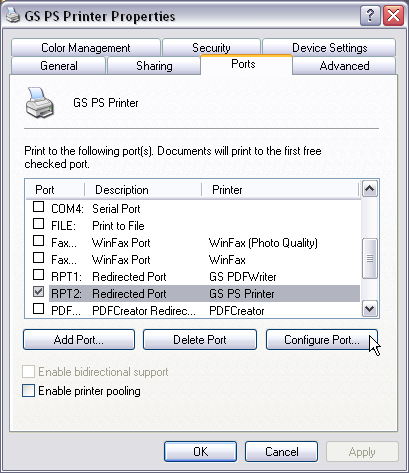
Under the Ports tab the correct port (created above) should already be selected (RPT1: or higher). Click on Configure Port…:
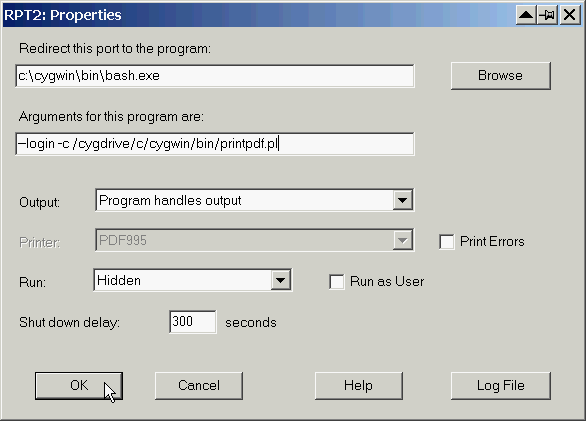
and fill out the dialog box as shown above.
Note: The Log File button can be useful for tracking down problems should the printer fail to work properly.
- Select Properties of the newly created GS PS Printer
- Now, if you send a job to this printer, a .pdf file with the name of YYMMDD_HHMMSS.pdf shall appear in the directory that you specified in the Perl script. You can even share this printer over the network so that any virtual machines you have running old games for your child can print to this file also.

The script file you download has an error in it.
$outpath='”/cygdrive/c/Documents and Settings/IMarvinTPA/My Documents/aaprint/’;
basically add /cygdrive before /c